 Alpaca.js is a client-side forms and templating engine that will build some pretty sweet looking forms using nothing but a bit of JSON and JavaScript, complete with data validation and layout control. I extended Alfresco using this library to enable users to create and edit structured content stored in the repository, such as XML and JSON.
And thus, alfraca was born!
Yesterday, I joined Jeff Potts, Dave Draper and Luis Sala at the first ever Alfresco meetup on Google+ to discuss this work which Tribloom has done for a customer.
This client was storing XML files in Alfresco. Their users wanted an easy way to create and modify these files without having to download the file, update it, and re-upload it to Alfresco so we decided to provide them with a dynamic forms engine that could display this content directly from the Share document library.
Alpaca, created by CloudCMS, is easy to use and configure and I’ll outline the modifications we made to Alfresco to make it the Alpaca forms accessible from Share. The relevant code has been extracted into a GitHub repository and can be used to follow along with this post.
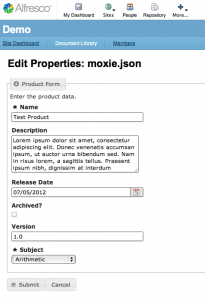
In the repository are two Eclipse projects – one for Alfresco and one for Share – that can be built and deployed using the included Ant scripts. The example I use in this post also expects the sample “moxie.json” file to be uploaded to the document library. Once everything is deployed, the integrated form will display the moxie.json content like this:
We extended Share in three key areas. First, we created a custom page that renders the necessary script, CSS, and DOM tags that Alpaca uses to display the form. Next, we configured a custom action that allows the user to access this page and made that action available only when viewing specific kinds of content. Finally, we built webscripts to send and receive the necessary JSON, reading it from and writing it to the repository.
The custom page is what ties Alpaca and Alfresco together. This page is defined in three pieces:
1. Page description
config/web-extension/site-data/pages/edit-alpaca.xml
This file describes the custom page and directs Alfresco to a Surf component template, named in the <template-instance> tag.
<?xml version='1.0' encoding='UTF-8'?>
<page>
  <title>Edit JSON with Alpaca</title>
  <title-id>page.editMetadata.title</title-id>
  <description>Edit a JSON node with Alpaca forms</description>
  <description-id>page.editMetadata.description</description-id>
  <template-instance>edit-alpaca</template-instance>
  <authentication>user</authentication>
</page>
2. Template description
config/web-extension/site-data/template-instances/edit-alpaca.xml
This page lays out the Surf components that comprise the custom page.
<?xml version='1.0' encoding='UTF-8'?>
<template-instance>
  <template-type>org/alfresco/edit-alpaca</template-type>
  <properties>
    <pageFamily>documentlibrary</pageFamily>
    <container>documentLibrary</container>
  </properties>
  <components>
...
    <!-- Edit Metadata Form -->
    <component>
     <region-id>edit-alpaca</region-id>
     <url>/components/alpaca-form</url>
     <properties>
     <itemKind>node</itemKind>
     <itemId>{nodeRef}</itemId>
     <mode>edit</mode>
     <submitType>json</submitType>
     <showCaption>true</showCaption>
     <showCancelButton>true</showCancelButton>
     </properties>
    </component>
  </components>
</template-instance>
3. Surf component
In the config/web-extension/site-webscripts/org/alfresco/components/alpaca-forms/ directory, these files describe the component referred to by the template:
alpaca-form.get.desc.xmlalpaca-form.get.head.ftlalpaca-form.get.html.ftlalpaca-form.get.properties
Together, they render the necessary script and CSS tags to include the Alpaca library on the page, and pull in the custom JavaScript files that communicate with Alfresco. The magic happens in alpaca-form.get.html.ftl:
<div>
  <div id="alpaca-form-field"></div>
  <div id="alpaca-form-field-button-bar"></div>
  <script>
  Alpaca.Forms.Product.initialize("${(page.url.args.nodeRef!"")?js_string}");
  </script>
</div>
The initialize function passes the node reference to the code that will query Alfresco for the JSON object and pass it to Alpaca. Alpaca will then attach itself to the “alpaca-form-field” div element and–voila!–instant form goodness.
Diving into the Alpaca specifics a bit more, you can see the request and rendering occurring in web/alpaca/js_src/AlpacaForms.js. This file is included as part of the Surf component and sets up a namespace and defines the function we’ll use to invoke Alfresco and do some housekeeping. The initialize function retrieves the content from Alfresco with a jQuery AJAX call and then passes it to Alpaca.
$.ajax({
  url : "/share/proxy/alfresco/api/node/content/"
    + storeType + "/" + storeId + "/"
    + nodeId,
  success : function(content) {
    $("#alpaca-form-field").alpaca({
     "data" : content,
     "schema" : Alpaca.Forms.Schema.Product,
     "options" : Alpaca.Forms.Options.Product,
     ...
    });
  },
  ...
});
We also provide Alpaca with a description of the JSON object it will be receiving. This description is broken into two pieces: the “schema” and “options”. The schema describes the JSON object and its properties. The options describe how those properties will be rendered as form components. In the demo project, we are using the example of a piece of JSON describing a product called “moxie.json”:
{
  "product" : "Moxie",
  "description" : "Lorem ipsum dolor sit amet, consectetur adipiscing elit...",
  "release-date" : "06/22/2012",
  "archived" : false,
  "version" : "1.0",
  "subject" : "Reading"
}
Alpaca is configured with a schema that describes this structure in web/alpaca/js_src/schema/ProductSchema.js:
Alpaca.Forms.Schema.Product = {
  "title" : "Product Form",
  "description" : "Schema for Demo Product JSON object",
  "type" : "object",
  "properties" : {
    "product" : {
      "title" : "Name",
      "type" : "string",
      "required" : true
    },
    "description" : {
      "title" : "Description",
      "type" : "string",
      "required" : false
    },
    "release-date" : {
      "title" : "Release Date",
      "type" : "string",
      "required" : false
    },
    "archived" : {
      "title" : "Archived?",
      "type" : "boolean"
    },
    "version" : {
      "title" : "Version",
      "type" : "string",
      "required" : false
    },
    "subject" : {
      "title" : "Subject",
      "type" : "string",
      "required" : true,
      "enum" : [
          "Arithmetic",
          "English",
          "French",
          "Geography",
          "German",
          "Reading",
          "Spanish",
          "Writing"
      ],
      "default" : "Reading"
    }
  }
};
Next, the options describe the form fields that Alpaca should render for each property:
Alpaca.Forms.Options.Product = {
  "label" : "Product Form",
  "helper" : "Enter the product data.",
  "type" : "alpaca.demo.product",
  "fields" : {
    "product" : {
      "type" : "text"
    },
    "description" : {
      "type" : "textarea"
    },
    "release-date" : {
      "type" : "date"
    },
    "archived" : {
      "type" : "checkbox"
    },
    "version" : {
      "type" : "text"
    },
    "subject" : {
      "type" : "select",
      "optionLabels" : [
        "Arithmetic",
        "English",
        "French",
        "Geography",
        "German",
        "Reading",
        "Spanish",
        "Writing"
      ]
    }
  }
};
Once Alpaca has these descriptions and the JSON object itself, the form can be rendered.
To access the form, we configured an action link that is visible on the node from the document library. This action passes the document’s node reference to the custom page, which then passes it to the JavaScript function. We don’t necessarily want the new page to be accessible for any piece of content, so we restricted the action based on content type. This can be seen in the file config/web-extension/alpaca-action-context.xml:
<?xml version="1.0" encoding="UTF-8"?>
<!DOCTYPE beans PUBLIC '-//SPRING/DTD BEAN//EN' 'http://www.springframework.org/dtd/spring-beans.dtd'>
<beans>
  <bean id="evaluator.doclib.action.edit-alpaca" parent="evaluator.doclib.action.isMimetype">
    <property name="mimetypes">
      <list>
        <value>application/json</value>
      </list>
    </property>
  </bean>
</beans>
The action is then configured in share-config-custom.xml using the above evaluator to control visibility:
<alfresco-config>
  <config evaluator="string-compare" condition="DocLibActions">
    <actions>
      <action id="document-edit-alpaca" type="pagelink" label="actions.document.edit-alpaca">
        <param name="page">edit-alpaca?nodeRef={node.nodeRef}</param>
        <permissions>
          <permission allow="true">Write</permission>
        </permissions>
        <evaluator negate="true">evaluator.doclib.action.isLocked</evaluator>
        <evaluator>evaluator.doclib.action.edit-alpaca</evaluator>
      </action>
    </actions>
    <actionGroups>
      <actionGroup id="document-browse">
        <action index="100" id="document-edit-alpaca" />
      </actionGroup>
      <actionGroup id="document-details">
        <action index="100" id="document-edit-alpaca" />
      </actionGroup>
    </actionGroups>
  </config>
</alfresco-config>
Finally, leveraging Alfresco’s webscripting capabilities, we built HTTP endpoints that send and receive node content in JSON format. In the demo project, I’ve assumed that the node content is already JSON (with a mimetype of “application/json”) and because of this I can point the custom code to the out-of-the-box content retrieval webscript at /api/node/content. As a side note, we converted our customer’s XML content to JSON in this webscript.
The webscript to store the new JSON object takes a node reference and simply stores the JSON directly to the content of the node. Take a look at the webscript files located at demo-alpaca-repo/config/alfresco/extension/templates/webscripts/com/tribloom/demo/product/product.post.json.js:
function main() {
  model.success = false;

  var nodeRef = url.templateArgs['storeType'] + "://"
        + url.templateArgs['storeId'] + "/"
        + url.templateArgs['nodeId'];

  var scriptNode = search.findNode(nodeRef);

  if (scriptNode == null) {
    status.code = 500;
    status.message = "Unable to find node for nodeRef " + nodeRef;
    return;
  }

  scriptNode.content = json;

  model.success = true;
  model.nodeRef = nodeRef;
}

main();
These three customizations are common changes that illustrate how simple it is to extend Share – particularly with the improvements to 4.0 that provide extension points in the XML configuration files.
By using the Alpaca library as an example, I hope I’ve demonstrated this and shown that Alpaca is an easily integrated library that gives you forms capabilities with minimal development.